Post Header
Creating and editing a collection
So, you've decided to run a gift exchange challenge. Awesome. Here's a guide to help you get started.
1. Go to the Collections tab and click New Collection.
A gift exchange is run within a Collection.

2. You should see this screen:

- Select owner pseudonym(s): Which pseudonym you'd like to be shown as the owner of the collection.
- Icon: The icon (if any) you'd like to represent the challenge.
- Parent collection: If this is a sub-set of another collection (for example, one year of a challenge that has been run for multiple years), enter the parent collection here.
- Collection name: the name of the collection. For example, Annual_Example_Challenge_2010. This will define the URL (web address) of your challenge so there can be no spaces.
- Display Title: For example, Annual Example Challenge 2010. There can be spaces here.
- Email: If you've got a separate email address for running the challenge enter it here. If you haven't, by default email messages will go to the challenge owners.
- URL for custom header: If you'd like to have a custom header for your challenge, enter the URL where the image can be found on either your own webspace, or that of a photo sharing site.
- Brief description: A brief description of your challenge, which will show on the Collections main page and the Profile page.
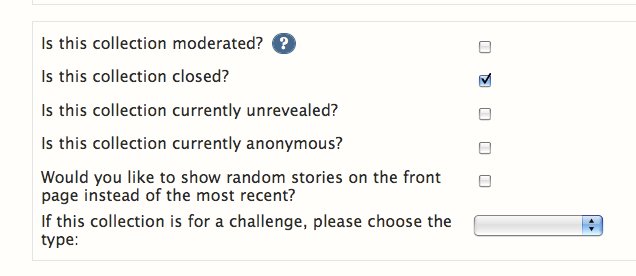
- Is this collection moderated?: Tick this if you would like your collection to be moderated. If a collection is moderated any registered user can post to it, but all works must be approved by a moderator or owner.
- Is this collection closed?: Tick this if your collection is Closed. If a collection is closed, no one can post to it. Remember to open it when asking people to post their works.
- Is this collection currently unrevealed?: Tick when you would like to hide your challenge entries, untick when you would like to reveal them.
- Is this collection currently anonymous?: Tick if you would like your challenge's works to be anonymous. Untick to reveal the authors of the works.
- Would you like to show random stories on the front page instead of the most recent: Tick this if you'd like to show random works on the home page of the collection instead of the most recent.
- If this collection is for a challenge, please choose the type: Select gift exchange from this drop down menu.
The next three optional fields are where your Introduction, FAQ (Frequently Asked Questions) and Rules can be entered. These will appear on the Profile page. However, the Rules and FAQ become their own menu entries on the left-hand side once entered so they can be easily found by your participants.

Note: If you are creating a sub-collection these will be inherited from the parent collection by default, but anything you enter in this sub-collection will take precedence.
Gift Notification Message: In this field you can create a custom message that will appear in the emails when works are revealed and participants are notified of their gift. This is optional.
To alter these at any time go to the Settings menu item, or select the Settings button at the bottom of the Profile screen.

Membership
Depending on what sort of challenge you're running and its size, you may want to assign moderators and tightly control who can post to the collection. This is done on the Membership screen.
To go there click the 'Membership' button on the challenge's dashboard or Profile page.
![]()
By default you will appear as an owner of the challenge. You can have multiple owners if there is someone or a few someones helping you run the challenge. Everyone you assign a role to must have an AO3 account. When you enter a name the site will search for AO3 user names.
The roles it is possible to assign are:
- Member: This person can post works to the challenge without prior approval.
- Moderator: This person can approve/reject works, and add members.
- Owner: The owner can approve works, assign pinch-hitters, and alter the sign-up form and FAQ and Rules fields. You can have multiple owners.
- Invited: This functionality has yet to be rolled out.
Note: By default, all registered users can post to a challenge, being a member of a challenge just means that they can post to a moderated challenge, and their work will be accepted without moderator approval.
Sign-Up Form Settings
To set up the challenge sign-up form go to Challenge Settings, this is near the bottom of the left-hand side menu.

You should see this page:

Schedule
To set up the timings of your challenge, use the Schedule.

These times are only for information and will not automatically open sign-ups, close sign-ups or reveal works. This will all need to be done manually.
The times will appear on the Profile page of the challenge.
Sign Ups Open?
The Sign Up open tick-box is where you open or close sign-ups. Leave this box unticked until you have your sign-up form ready.

Requests and offers
Request and Offers sets the number of requests and offers you'd like the participants to use. You can set a required number (how many they need to have) and an allowed number (what is the maximum number they can have).

In the example above, participants must be make at least one request and offer, but can make two separate offers if they chose.
Then, you have to set the tag settings for the requests,

and offers.

These will define what a participant's requests and offers can contain.
- Optional tags: Click this if you would like to allow optional tags. These are tags that participants can add which will be matched on if possible, and allows your participants a little more flexibility with their requests and offers.
- Details/Description: Tick Required if your challenge needs to include more details than just a relationship or fandom, and Allowed if you would like to give participants the choice to include more details.
- URL : Tick Required if your challenge needs a URL (for example, where the participants works are archived) or Allowed if you would like to give participants the option of including one (for example, a link to a Yuletide letter).
You can leave both of these blank if you like and select neither box.
Now, you can define how many fandoms, relationships, or ratings participants are allowed to chose.
To do this enter numbers into the required and allowed boxes. You do not have to fill in all of these, and if you are using automatic matching it will take a longer time to match them if you fill in too many.
If you are running a challenge that is specifically for a given fandom or relationship or character, just leave that set of tag options set to no tags required or allowed -- don't put in that one tag as the only choice. Tag options should only be used where you want participants to have a choice.
Next you can define what tags people can chose from when making their requests and offers.
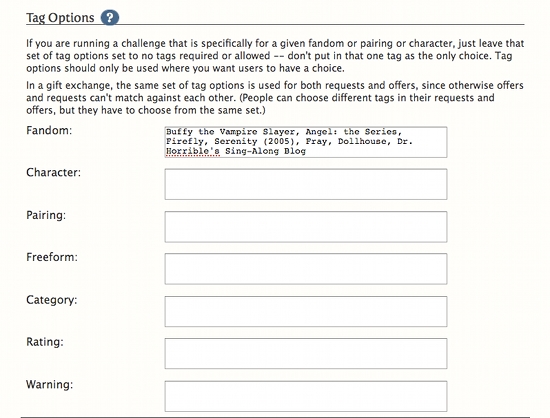
In the example above, participants can choose from any of the fandoms listed in the fandoms field. Anything entered in these fields should be comma-separated and will auto-fill.

Note: In all of the fields, you will only be able to choose canonical tags that are already in the AO3 system. If you wish to include a fandom, relationship, character or additional tag (freeform) which is not already in the system, please contact the Tag Wrangling Committee through the Support and Feedback form or via the Tag Wrangler's twitter account, @ao3_wranglers. When possible, the committee asks that these requests be lodged at least one month before opening a challenge, to give tag wranglers time to review and add necessary tags. The Committee can also add additional tags (freeforms) for members to add to their posted works as required.
.
The next set of drop-downs determined the minimum level of matching that must occur in each field. That is, how many characters or fandoms must match between the participants to consider them a match. The simplest option is to chose to match them on Requests, meaning anyone with a Request matches another person with a Request, but this may not work for more complicated challenge with a variety of different tags in use.
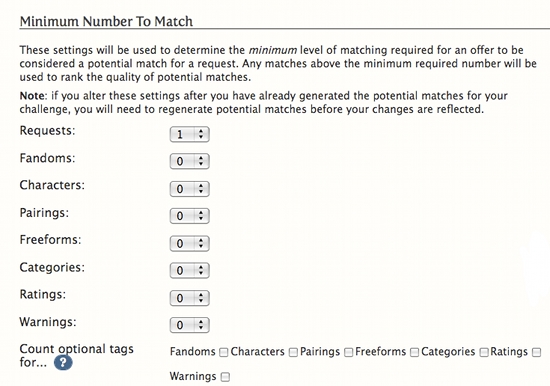
If you leave a 0 in the drop down it will not match on this field.
Note: the most options that are chosen here the longer matching may take, and the harder it will be for matches to be found.
Optional tags: If you chose to use optional tags above, you can choose what field(s) they are used to match on if possible.
Next are three fields which define the challenge-specific instructions that will go with the sign-up form.
You can also change the labels for the URL and Description fields if you are using them.

For example, as seen above, if you are running a challenge where participants need to provide a link to where their fic is archived, you could call the field, 'My fic is located at:.'
Remember: check the Sign-Up Form to make sure it's working how you'd like before opening it up for people to sign-up for the challenge.
Now you're ready to open the sign-ups!
To do this go to the Settings menu and tick the 'Signups open?' tickbox.
Checking the Sign-Ups
You can check the sign-ups as they come in by going to the sign-ups menu item on the challenge side-bar.
Here you can see what participants have chosen.
To make the list easier to navigate (especially if you have multiple requests and offers) you can hide the descriptions using the Hide Descriptions button on the top of the screen. To bring them back click Show Descriptions.
If you need to contact a participant for any reason you can click the envelope icon next to their username.
![]()
If for any reason you wish to edit or delete a sign-up use the edit and delete links on the left hand side.
You can also download an Excel spreadsheet of the sign-ups. To do this click the Download (Excel) button at the top of the screen.
Close Sign-Ups
Since the dates on the Schedule are provided only for information, you must close sign-ups manually.
To do this go back to the Challenge Settings menu and untick the Signups Open tickbox.
Sign ups are now closed.
Generate potential matches
Now you have closed sign-ups, let's do some matching for your gift exchange.
Depending on the choices you made when you set up the Sign-Up Form this may not be necessary, or you may chose to manage the assignments manually. If so skip through to Adjusting Assignments
To generate matches go to the Matching menu.
There will only be information here once you have closed sign-ups.

Click Generate Potential Matches.
If your challenge settings mean that you don't require automatic matching, you will get a warning that the automatically generated matches will be at random. Click OK if you wish to continue.

Matching can take a while depending on how big your challenge is and the criteria you have set.
You will receive an email when the matching is complete.
The matching screen should look something like this:

Adjust assignments
You can adjust the assignments in two ways:
1. Automatically
To automatically adjust the assignments click 'Regenerate assignments' and the matching process will be run again.

Note: Depending on your matching settings, this might not make a lot of changes to your assignments. If you alter something on the Challenge Settings Page then this may make more of a difference.
2. Manually
To adjust the assignments use the drop down menus.

Note: If you adjust the assignments, they will not readjust automatically so that each participant has another writing for them. You will need to check them manually (or regenerate assignments).
To see all the potential givers for any one participant use the links under the Potential Givers column.

Clicking on a potential users name brings up their sign-up.

Once you have finished click 'Update Assignments'

If you have any participants who don't have an assignment, it it will show up under 'Missing recipients'

Use the drop down menu to select the recipient and click 'Update assignments' and they will return to the main table.
You can also chose to write in a pinch-hitter in the right-hand field. Pinch hitters do not have to be signed-up for the challenge, but must already have an AO3 account.
Send assignments
Once you are happy with the assignments, to send them to participants click 'Send Assignments.'

All of the challenge maintainers will receive an email when the assignments have been sent to all participants.
Managing Posted Works
Once the assignments have been sent out you should now see this screen when you click Assignments (which has replaced Matching in the side menu).

As participants post works this will be shown in this table.

If you are running a moderated challenge, each work will have to be approved by an owner or moderator before it can be added to the collection.
This is managed through Manage Items, which can be found on the profile page of the collection.
![]()
Use the drop-down menu under Collection Approved to either accept or reject the work.

You also have to option to Remove a work, using the option on the right-hand side and to keep a work unrevealed from the rest of the collection using the Unrevealed tickbox.
Works, once they are accepted, will be added to the collection (but will remain hidden until you reveal them) as well as any by users who are Members of the challenge and have therefore been pre-approved to post to it.
If you are not running a moderated challenge, the works will be added to the collection automatically.
Managing Defaulters
If a participant has defaulted, use the tick box beside their name.
Once they have been marked as a defaulter this will appear:

To assign a pinch-hitter:
Enter the pinch-hitter's archive username in the pinch-hitter field (again remembering they don't have to be already signed up for the challenge but do have to have an AO3 account). The field will auto-complete to check that the user has an AO3 account and this may take a second.
Once you have done this click 'Assign' and an email with their assignment will be sent to them.
Once a pinch-hitter has been assigned they will not appear on the main table on the Assignments screen, but will rather remain at the top of the screen in the separate pinch-hitters table. By default covered pinch-hits are hidden, and uncovered ones are shown, but to unhide covered ones click 'Show Covered Defaults.'
Note: You can also default all participants who have not posted to the challenge by using the 'Default All Unposted' button at the top of the screen.

Close Challenge
To close the challenge so no more gifts can be added, go to 'Challenge Settings' and tick the box beside 'Is this collection closed?'

You can of course chose to leave this open if you'd prefer. :)
Reveal works
It's time to reveal the works!
To do this go to the Settings page for your challenge and untick the box that says 'Is this collection currently unrevealed? '
You can leave the collection closed if you don't wish participants to add any more works.
You've successfully set up and run a gift exchange challenge on AO3. Congratulations! :)
Yvi Sun 15 Aug 2010 11:38AM UTC
Comment Actions
Zooey_Glass Sun 15 Aug 2010 03:18PM UTC
Comment Actions
sophinisba Tue 24 Aug 2010 01:49PM UTC
Comment Actions
Zooey_Glass Thu 09 Sep 2010 12:42PM UTC
Comment Actions
lavvyan Fri 31 Dec 2010 09:20AM UTC
Comment Actions
Zooey_Glass Fri 31 Dec 2010 01:55PM UTC
Comment Actions
lavvyan Fri 31 Dec 2010 02:09PM UTC
Comment Actions
kisahawklin Sat 29 Jan 2011 03:39AM UTC
Comment Actions
Zooey_Glass Thu 10 Feb 2011 11:30AM UTC
Comment Actions
kisahawklin Fri 11 Feb 2011 03:56AM UTC
Comment Actions
amaresu Thu 10 Feb 2011 08:16AM UTC
Comment Actions
Zooey_Glass Thu 10 Feb 2011 11:25AM UTC
Comment Actions
amaresu Fri 11 Feb 2011 12:57AM UTC
Comment Actions
Zooey_Glass Fri 11 Feb 2011 10:33AM UTC
Comment Actions
Lune_Kuruta Thu 07 Mar 2013 03:04AM UTC
Comment Actions
lily_winterwood Sun 13 May 2018 07:32AM UTC
Comment Actions
Rosemarycat5 Sun 12 Jul 2020 04:41AM UTC
Comment Actions
RationalElderberry Sun 21 Nov 2021 04:11PM UTC
Comment Actions