AO3 News

Post Header

Published:
2012-03-01 21:13:59 UTC
Tags:

One of the Support tickets we're seeing more of is "How do I post my multimedia works?" It's not yet possible to host vids, art or soundfiles on the Archive, but you can embed works hosted elsewhere, so we wanted to let you know more about how to do that.

All information is current as of November 2019, and is subject to change as we move forward.

Tags and Finding Audio-Visual Works

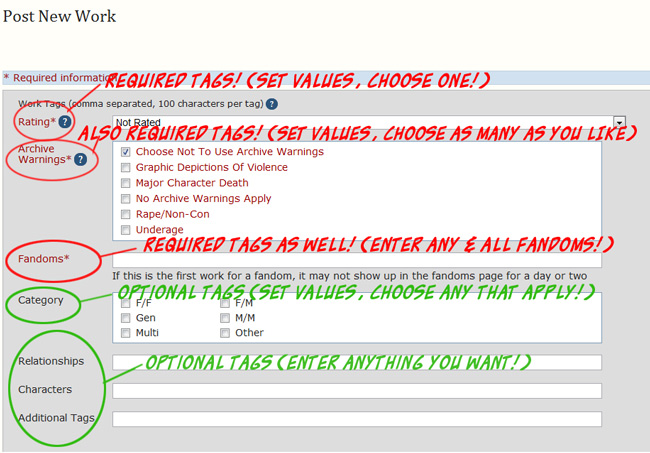
Right now, the best way to help people find your multimedia works is by adding the information in the Additional Tags Field. The current 'canonical' for audio fics (podcasts, audiobooks, and other such works) is the Tag Podfic, which has subtags for most of the file types (canonicals are the tags which show up in our browsing filters - other variants of the tag are hooked up to that so it finds them all). There is also a Podfic Available tag for authors who have audio versions of their work posted by another author or on another site. We also have a tag for Fanart, with many different subtags.

There is already a lot of video under the Fanvids tag. Some are links to the works posted off-site, but many are embedded in the Archive and can be commented, kudosed, bookmarked, and shared!

We are discussing behind the scenes how to categorize audio/visual media works as we expand this aspect ofin the future, and at some stage will ask for public comment, so keep an eye out for that! Until then, you can use these tags to find your favorite works in new forms, or tag your own works so others can find them!

Posting a New Multimedia Work

Right now, we don't have on-site hosting, so you'll have to host your file at another site such as Vimeo, YouTube, or your own website. You can always just create a link in your work so a user goes to your hosted site, but where's the fun in that? Here's what you need to know if you want to just press play!

Using Embed Code from Other Sites

The HTML Sanitizer we use runs a very tight whitelist on sites we allow to provide media code (this is necessary in order to ensure we don't let malevolent code slip by). If it's not posted to one of these listed sites, the Sanitizer will delete the embed code entirely.

  • archive.org
  • criticalcommons.org
  • dailymotion.com
  • google.com
  • metacafe.com
  • podfic.com
  • ning.com
  • soundcloud.com
  • spotify.com
  • vidders.net
  • viddertube.net
  • vimeo.com
  • youtube.com
  • 8tracks.com

We are currently keeping the whitelist short, evaluating each host site for stability, code vulnerability, content (whether fans are using it), and the size of its user base. (If you know of a site that you think should be on this list, submit a Support ticket and we will submit it for review. This may take a little while, so you may want to use another host in the meantime.)

Some Notes about HTML Code

ETA: We now support the audio and video tags!

There are four ways to embed audio/video in HTML. Currently, we support code starting with the following three tags:

  • <object> - this is the older method that YouTube and Vimeo used to embed video until recently. It's reported to be buggy on iDevices, so use with caution.
  • <embed> - this tag is mostly used for audio, and occasionally to simplify the mess that <object> generates. It's a lot easier to read and compatible with more platforms, so if you have a choice between <object> and <embed>, choose the latter.
  • <iframe> - This is the newest style media embedding tag that we currently support and the most widely accepted for mobile media. Unlike the other tags, <iframe> functions as a separate window within your page to generate the content. This means that a user running NoScript, AdBlock, or similar may have to specifically request to see your media. By default, YouTube, Vimeo, and many other sites will try to give you <iframe>.
  • <audio> or <video> - These are HTML5 tags, and as of November 2019, we now support them! Read more about using them at the announcement post. Note that content using <audio> or <video> are not subject to the whitelist.

If you are writing your own embed code and find a property stripped out that you think should remain, let us know!

Inserting Art

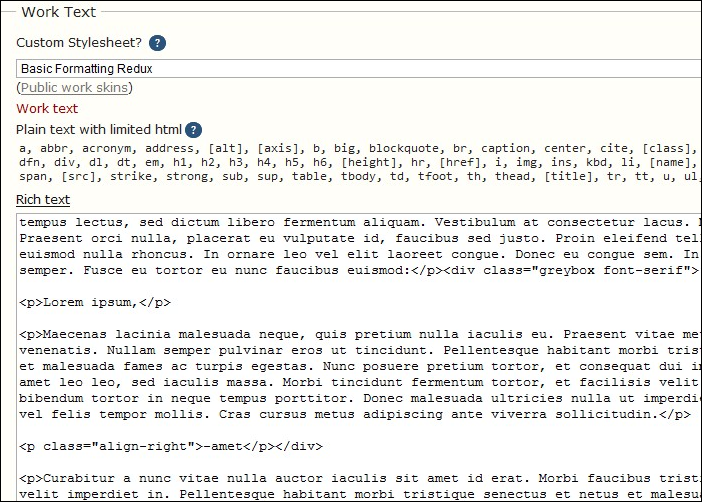
Many websites that host your images will provide the code to embed the image in another site. Just remember that the code has to be posted into the HTML Editor, not the Rich Text Editor. Some sites do provide a lot of formatting in their code. The part you absolutely need to keep is the <img src="... /> portion.

If you prefer to use the Rich Text Editor, you can click on the "Insert Image" icon. You will need the actual link to the image, instead of the whole embed code. It will be something like http://www.host.com/.../image.jpg or http://www.host.com/.../image.png - It has to have the file extension at the end, though!

We currently don't restrict image sources, but there are some tips and tricks, depending on your host site. This is a non-exhaustive list of possible file hosts:

flickr.com
Caution - can be used, but the share link has to be heavily modified to work
dropbox.com
Caution - can be used, but the share link has to be heavily modified to work
deviantArt
Caution - dA's native embed code is removed by the parser, but you can right-click on an image and copy the image URL for the Rich Text editor
tumblr.com, twitter.com, facebook.com
Not recommended - you can right-click to get direct image links, but image links do change over time with no warning. This breaks the image display.
drive.google.com, onedrive.live.com
Not recommended - does not provide direct image links
photobucket.com, imgur.com
Not recommended - file hosting for embedding is not allowed in their Terms of Service

If you find a site that isn't working, let us know via Support!

Inserting Video

ETA: We now support the audio and video tags!

Like images, most websites that host video for you will provide you the embed code to place in a post - you can just copy and paste this code into the HTML editor of a new work, tag it and post it! (See Known Issues below)

Inserting Audio

ETA: We now support the audio and video tags!

Embedding video is fairly straightforward if you're using the above sites. Embedding audio, on the other hand, requires passing the data through the Archive's public audio player. As of November 2019, we recommend against using the Dewplayer plugin.

  1. Find the direct link to your audio file. The file has to be in the MP3 format - none of the other common audio file types will work consistently.
  2. In your work, in the HTML editor, copy and paste the following:
    <embed type="application/x-shockwave-flash" flashvars="mp3=MP3_FILE_URL" src="http://archiveofourown.org/system/dewplayer/dewplayer-vol.swf" width="250" height="27" allowscriptaccess="never" allownetworking="internal"></embed>
  3. Replace MP3_FILE_URL with the full link to your audio file. Make sure to include the http:// from the address, or the plug-in will be very confused. Also make sure your browser hasn't given you "smart" angled quotes. There are several other player versions available at our post announcing the new player software.
  4. Once you post the work, make sure to press play to verify all the servers can find each other.

Known Issues

  • Pasting with quote marks: Several of the major browsers are converting regular quote marks to angled smart quotes when pasting in code. These smart quotes will be stripped out by the parser, rendering the code unusable and causing the entire embed to be stripped out. You'll need to manually go through the pasted code and replace the "smart" angled quotes with straight double quotes.

The Future

In the future, we would like to provide on-site hosting of multimedia (it's likely that fanart will be the first media type we are able to support).

Comment

Post Header

Published:
2011-11-12 02:53:21 UTC
Tags:

The new skins on the Archive have lots of spiffy features. We'll be building up documentation on them as we go along, but we wanted to start you off with a few key bits of information!

What public skins are there for me to use?

There's a masterlist of all the new public skins with some brief descriptions of what they do. Many of these skins are designed to affect very specific bits of the Archive - you can chain them together to get the effect you want.

What's chaining skins? How do I do it?

Basically, chaining skins means joining more than one skin together so that you can reuse rules from existing skins and then write your own CSS for the things you want. Some of the skins already on the Archive are built up from more than one skin; for example, if you take a look at Zebra Mono you can see a Parent Skins listing with "Snow". This means that the Zebra Mono skin is using all the code from the Snow skin, which turns all the backgrounds white.

To create a chained skin:


  1. Go to http://archiveofourown.org/skins/new (accessible from your user dashboard).

  2. Scroll down and expand 'Advanced'.

  3. Select 'Add parent skin'

  4. Type in the name of the skin you'd like to use as a parent (for example, if you'd like to base your skin on For the trees type that in). An autocomplete will trigger to help you make sure you get the name of a real skin.

  5. Your parent skin will be loaded first, and anything you put in the CSS box will override the things in the parent skin.

  6. If you want to use more than one parent skin, you can do so, so you could combine, e.g. Don't Care a Button and Wide margins to get a skin which had plain text buttons and wide margins on work pages.

  7. Give your new skin a name and a description (and a preview image if you want to submit it as a public skin, or just for your reference).

  8. Hit 'Create'. You'll be taken to a page which lets you preview or use your skin.

  9. One known issue which will be fixed very shortly, but so it doesn't trip you up right now: if all you change in your skin is the parents, the display won't update, so try just sticking a comment in your css and editing it when you make other changes!

    How can I create spiffy new skins using the new system?

    The skins added with the new code are a good place to start - check out the masterlist of all the new public skins and follow the links to view the code for each skin. For basic skin customisation, simply copying the code of a skin you'd like to use and editing it is often effective.

    If you want to get more complicated, you might find the Archive front end documentation useful for digging into the details of the site CSS.

    If you're working on developing skins, the Firefox add-on Web Developer is a nifty tool which lets you live-edit CSS so you can try out different changes without repeatedly saving and editing a skin.

    Can I see skin creation in action?

    For the visual learners among you, you might like to check out lim's screencast showing the creation of a new skin.


Comment

Post Header

Published:
2011-09-15 19:23:22 UTC
Tags:

The number one topic for support requests on the Archive of Our Own is the 1000 work limit on search and browse results. This was an early stopgap measure to prevent the servers from going 'splodey, and initially it didn't matter much, because there weren't 1,000 works of anything. But nowadays, if you want to read, say, Stargate Atlantis fic, with over 10,000 works, clicking on "Stargate Atlantis" brings up less than 10% of the available fic. This is understandably annoying to our users!

Eventually there will be fixes to the 1,000 works cap; the problem is being worked on (as evidenced by the 502s, server-'splodeyness is still a concern). Until then, however, there are still plenty of ways around it! If you're a completist trying to see all the fics, here's a few tricks to help you out:

Sort by: at the top of every works list page for a tag (such as works in a fandom, e.g. Stargate Atlantis, or works for a character, relationship, or additional tag) there are various ways to sort. The default is by published date, descending (newest to oldest); you can also sort by author, title, or my favorites, hits and word count. (After the next code update, you'll also be able to sort by the date added to the site - this will make it easier to find works added to the site recently, but backdated to the date they were originally written.) This sort covers all the works under the tag, not just the 1,000 listed. If there are less than 2,000 works in a fandom, you can easily access all of them by reversing the sort order - e.g. click on "Date" and it will sort by oldest to newest, bringing up all the early stories you missed in the first run of 1,000. So I can browse the most recently published Homestuck, and then the earliest published Homestuck, and thus catch all of the 1,600+ HS works on AO3.

I like to sort by word count myself, since I like reading longer stories; sorting by word count in SGA, for example, gives me all the SGA stories on the Archive over 9,000 words. On the other hand, if I'm in the mood for something short, you can click on Word Count again, and it will sort in ascending order (smallest to largest), giving me 1,000 fics all under 300 words.

Obviously that leaves out a bunch of fics in the middle. But there are other ways to browse:

Tags and filters: AO3's tagging system isn't perfect but it's still awfully nifty and convenient now. You can access tags two ways - either by clicking on the tags themselves on any work, or by checking the filters on the right to combine tags (note that the "or" feature is a bit broken; "and" works fine though, if I only want to read mature-rated McShep.) Tag results can be sorted, same as described above (so you can see all the long McShep stories first). Tag results are still limited to 1,000, and there's far more McShep than that - but if you narrow the results further (say, filtering by AU) then you can see all 873 McShep AUs currently on AO3.

One thing to note when using the filters: the work counts you see next to a tag in the right sidebar only are counting the works in that first 1,000. So the numbers will be off - they might only show 300 works, but when you filter by them you'll get many more. So even if a tag only shows a few works, it still might be worth filtering by it. (Also, ways to filter by language and by complete vs WiP are coming soon.)

But wait, there's more:

Search & Advanced Search: Currently there's no way to negatively filter tags in browse (i.e. subtract a tag from results, rather than add it.) This feature is coming, but until then there are still ways to run a negative search, by using search - simply enter a search term with a hyphen before it. E.g. searching "Rodney McKay" -"John Sheppard" will find you fics with Rodney but without John.

In the search bar, a space will equal AND, finding works with everything entered. You can also do OR searches, using |, to find works with either one thing or another, and you can combine these. So searching "Alternate Universe" Homestuck | "White Collar" will bring up works tagged with "Alternate Universe" in either the Homestuck or White Collar fandoms.

The advanced search feature is even more powerful - as well as searching tags, titles, and authors, you can also search for specific word counts, hits, kudos, and date - including ranges, which is useful tool for finding fics in a fandom. For example, you can search for all Stargate Atlantis fics published 5-6 years ago.

The date tool is a bit clumsy for finding all the fics, however; the word count search is probably better for that. To bring up all the fics, start with a range, e.g. 0-200. Then, once you've looked over those results, increment it, 201-500. As long as the results it brings up are less than 1,001, you are seeing all works within those parameters on the Archive. In that way you can fairly quickly go through all the fic in any fandom, or for a specific tag or tags.

A couple of notes about Advanced Search - like the rest of AO3 it's in beta and has its kinks. In particular it has trouble with tags with dashes - if you search for X-Men, for instance, you noticed you'll get lots with X and no X-Men. To get around this, put the tag in quotes: "X-Men". Also keep in mind that presently, unlike filters, searching for tags only brings up works tagged with that specific tag. So searching for "Charles/Erik" only brings up a handful of fics, while clicking on the tag "Charles/Erik" brings up the wrangled tag Erik Lehnsherr/Charles Xavier.

Hopefully this will help improve your AO3 experience! If you have any other tricks and tips, or questions about how to do any of this, please leave a comment below!

This is a modified version of an original post by Tag Wrangling Committee member X-parrot - thanks for allowing us to repost, X-parrot!

Comment

Post Header

Published:
2011-09-08 15:40:51 UTC
Tags:

The information in this news post is out of date. It is being kept for archival purposes. The Tag Wrangling Committee is working on new documentation that represents the current state of tags. You can view our current wrangling guidelines for more accurate information.

The tag system on the AO3 is an attempt to balance two needs that we feel are important:

  • Users should be able to apply any kind of labels they want to their works and bookmarks.
  • Users should be able to find, sort, and filter works according to tags.

"Tag wrangling" is the behind-the-scenes work that makes both of these things possible at once.

The first thing to know about tags is that all the fields at the top of the "Post New" form, everything before you get to the title of the work -- all of those are tags. A few of them have set values you can choose from (the Category, Warning, and Rating fields); all the others are free for you to type in whatever you want. Fandoms are tags, characters are tags, relationships are tags, additional tags are -- as the name suggests -- tags. The Archive software handles them all the same way.

Screenshot of the tags section in the 'post new' form, indicating that Ratings, Warnings and Fandom are required tags, while Category, Relationship, Character and Additional are optional tags

Since they're free-form text boxes, there's a lot of variation in what people put in, even when they're talking about the same thing. We encourage that variety! You're always welcome to use whatever form you want on your tags. But while other fans are likely to know that "Gurren Lagann" is the same series as "Tengen Toppa Gurren Lagann," or that "SPN" is an abbreviation for "Supernatural," the Archive software doesn't know that automatically. This is where tag wranglers come in!

The tag wranglers' job is to look at all the new tags on the Archive, figure out how they relate to each other, and link them up behind the scenes so that somebody looking for works about a specific thing can find all the works on the Archive without having to look separately for all the different variations. Wranglers have guidelines to make the standardized forms of tags that show up in the auto-complete and the filters, but you should always feel free to use whatever forms you like best: the point of tag wrangling is that users shouldn't have to use any standard forms. For tag-filtering to be possible, the Archive requires some kind of standard form; the forms wranglers have worked out are intended to be as clear as possible for as many users, and are adjusted the more tags we get, as we see how users create and use tags.

Tag wranglers make three kinds of linking. The first kind, synonyms, is pretty self-explanatory; it's hooking tags to the standardized form of the tag, so "Snarry" and "Harry/Snape" are both synonyms of "Harry Potter/Severus Snape". Clicking on any of those tags will bring up the same list of works.

The second kind, metatags, can get confusing (and sometimes leads to users asking "Why does this tag show up in the filters?"). A metatag looks the same as any other tag, but it can call up other filterable tags. You'll see this in fandom tags like "Batman - All Media Types," which is a metatag for "Batman (Comics)" as well as "Batman (Nolan movies)" and all the other kinds of Batman canon. Clicking on the "Batman - All Media Types" tag displays works that use any of its included tags -- so if you've posted a story tagged "Batman (Comics)," it will turn up in filters when somebody is looking for just comics-verse Batman works and also when somebody is looking for all Batman-related works of any kind. Unlike synonyms, metatags only work in one direction, so someone looking only for comics-verse Batman will not see works tagged for Batman movies.

The third kind is currently not visible to users, though as our fabulous coders keep working on improvements, that should change: behind the scenes, tags in different categories get attached to each other, making a map of how they all relate. The Archive knows, for example, that the relationship tag "Zack Fair/Cloud Strife" is related to the character tags "Zack Fair" and "Cloud Strife," and that the additional tag "Community: badbadbathhouse" belongs with the fandom tag "Persona 4." Right now that's just back-end information that the wranglers organize, but we're looking forward to the upgrades that will let everyone use this information for browsing.

All sorts of tag linking are trickier in the Additional Tags field, because it's more debatable what things should be attached to each other, and it's harder to see what other related tags might already be floating around the Archive (as of July 2011, there are over 25,000 not-fandom-specific Additional Tags -- that's a lot to keep track of!). The tag wranglers do their best, but if you find tags that aren't connected where you think they should be, or something that is connected where you think it shouldn't be, please submit a Support request and the wrangling team will investigate.

If making your tags filterable is important to you, here are a few things you can do to make that easier:

    1. Use commas appropriately – use them only to separate your tags and not within the text you want as your tag, as the Archive treats a comma as the end of a tag. If you want to use more than one tag in a category, use a comma between them, including the names of fandoms in a crossover (enter each fandom separately).
    2. Use the tag categories as described above: fandom names in the fandom tags field, relationship tags (either pairings or platonic relationships) in the relationships field, character tags in the characters field. For anything that doesn’t fit into those other categories, use additional tags.
    3. Spell-check your tags before posting – you proofread your works, why not your tags?

For more information on tags, please see the Tag FAQ. If you're interested in Tag Wrangling, we welcome Volunteers!

Comment

Post Header

Published:
2011-07-11 16:48:00 UTC
Tags:

Please note: Prompt memes are still at alpha stage and are in active development, so you may run into bugs. We're also still refining the user interface. More improvements coming soon!

So you want to participate in a prompt meme challenge? You may already know the one you want; if not you can check out the list of currently open challenges (linked from the main collections index when you're logged in). If an open challenge is a prompt meme challenge you'll see that in the information listed in the information blurb, and the 'Sign Up' button will be displayed.

Screenshot of the blurb for an open prompt meme challenge, reading 'Testing Prompt Memes (testingpromptmemes) by mumble; Mods: Cesy, Tel; Summary: Signups close at: Fri 08 Jul 2011 03:00AM EDT (08:00AM BST); (Open, Unmoderated, Prompt Meme Challenge). A button at the bottom reads 'Sign Up'.

Signing up and leaving prompts

You must be logged in to sign up. When you select 'Sign Up' (on the index blurb, or from the collection page) you'll be taken to a screen where you can enter a prompt for the challenge:

Screenshot of a form headed 'General Information', with fields for fandom, characters, Image URL.

The exact details of this screen will vary depending on how the challenge has been set up, but you will usually need to enter a fandom and a description of your prompt. In some challenges, you may be allowed or required to enter a URL - for example, a link to an image for an image prompt.

Note: In all the fields except the URL and description fields, you will only be able to choose 'canonical' tags that are already in the AO3 system (the set of available tags may have been limited further by the challenge owner). These will come up in the autocomplete when you start typing.

You can choose to make your prompt 'semi-anonymous'. This means that your prompt will be displayed as 'anonymous'; however, since it will still be linked in the database with your username, we can't guarantee 100% anonymity - in some circumstances, such as a coding bug, it might be accidentally revealed or guessable. (We've put a lot of work into minimising the risk, but we want to be sure that our users are completely informed about their levels of privacy.)

Once you have filled in your prompt, you can add more. When you're done, press submit!

Managing your prompts

Once you have signed up and created some prompts, you can manage your prompts by going to the collection's home page, e.g. http://archiveofourown.org/collections/collectionname and accessing 'Your Prompts' (usually displayed in the left-hand menu). Here you can edit your existing prompts, add another prompt, or delete your signup.

Please note: Selecting 'delete' on this page, will delete your entire signup, including all prompts. If you want to delete just one prompt, go to the list of all Prompts (select 'Prompts' in the left-hand menu), where your prompts will display with a 'Remove' button next to them.

Browsing and claiming prompts

You can browse all the prompts in a challenge by going to the collection's home page, e.g. http://archiveofourown.org/collections/collectionname and accessing 'Prompts' (usually displayed in the left-hand menu). When you see one you like, just select 'Claim'.

You can keep track of all the prompts you've claimed in a particular challenge by going to the collection's home page, e.g. http://archiveofourown.org/collections/collectionname and accessing 'My Claims' (usually displayed in the left-hand menu). Beside each prompt you'll see a button marked 'Post to fulfil' - if you click on this you'll be taken to the 'Post new' form with the details of the prompt filled in.

Filling prompts

Once you've claimed a prompt, you can 'Post to fulfil' the prompt from the main Prompts page. You'll be taken to the 'Post new' form with the details of the prompt filled in. Make sure it has just the right box ticked - we have one bug where it ticks extra random prompts as well, which will be fixed in the next deploy.

If you go directly to the 'Post new' form without clicking 'Post to fulfil', you'll see your claimed prompts under the 'Associations' section. Just tick the one you are filling in order to post the fill to the challenge.

Anonymous prompt fills

If the challenge maintainer has set the challenge to 'anonymous', then when you post your fill to the collection, it will be displayed as by 'Anonymous'. However, please note that at this stage you should consider anon prompt fills to be 'semi-anonymous', and your identity may be revealed under the following circumstances:

  • The challenge maintainer can see your identity
  • An author search will reveal anonymous works which may enable people to guess what you wrote
  • A tag for the fandom you wrote the anon work in will appear on the list of fandoms on your user homepage, which may enable people to guess what you wrote.

We're working on introducing enhanced anonymous features, but in the meantime you should be aware of the above issues: if it would be problematic for your authorship of a work to be revealed, you shouldn't rely on the Archive's anon option.

Happy prompting!

Comment

Post Header

Published:
2011-07-11 16:47:12 UTC
Tags:

Please note: Prompt memes are still at alpha stage and are in active development, so you may run into bugs. We're also still refining the user interface. More improvements coming soon!

A prompt meme challenge is a collection where participants leave prompts for other writers to use in a fanwork. It can be open or closed, anonymous* or not.

The basics

Getting started

To set up a prompt meme, go to the Archive's main Collections page. You must be signed in to open a new prompt meme challenge. Click on the "New Collection" button.

Required settings

You must pick a name for your new prompt meme. This will be the name the Archive associates with your collection. It is used in urls, so the name can only include letters (Latin characters), underscores and numbers.

You must pick a display title for your new prompt meme. This will be the title that is displayed to your users. This name can include spaces and non-Latin characters.

Optional settings

You may choose to upload an icon for your prompt meme. Icons icons must be 100 by 100 pixels in size. (You can upload larger or smaller images, but be aware they will be resized to 100 by 100.) They can be in jpeg, png or gif format.

If you want this to be one of a set of linked challenges, enter the name of a parent collection (must be a collection you maintain). For example, if you run a kink meme with several different rounds, you would create a collection called 'My Awesome Kink Meme' as the parent collection, and then make that the parent of subcollections 'My Awesome Kink Meme 2011' and 'My Awesome Kink Meme 2012'. All the rounds of your kink meme will then be linked together, and you can reuse the FAQ and profile from the parent collection instead of writing them again for each sub-collection.

Optionally, enter the email address where you would like to receive notifications about your prompt meme. If you don't enter an email here, notifications will be sent to the email associated with your AO3 account.

Optionally, enter the URL for a custom header image if you want one for your collection.

Choosing your settings:

Check the box if you want your new prompt meme collection to be moderated. You probably want to leave it unmoderated so you don't have to approve every new story. Don't worry - you can still delete stories that aren't appropriate for your collection.
You may change your collection's status to moderated or add a new moderator or owner later.

If you close the collection, no new stories may be added to your prompt meme.

If you check the box to make the collection unrevealed, works will be hidden until you reveal them.

If you check the box to make the collection anonymous, authors will be listed as "anonymous," but will be visible to you. (At this time there is no way to make a completely anonymous collection where even the mods can't see the identity of authors.)

To make your collection a prompt meme challenge, you must select "Prompt Meme" from the drop-down box labeled, "If this collection is for a challenge, please choose the type.'

Additional information

Optionally, fill in the text boxes (plain text with limited html) with your desired Introduction, FAQ, and Rules. You have 100000 characters for each. If your challenge has a parent collection, then it will inherit information from that for any of these fields that you leave blank.

Optionally, you may enter a custom message for the emails sent out with Gift Notifications - i.e. the notification users will receive when someone fulfils their prompt. You have 1250 characters. (There is also a box for custom text for Assignment Notifications, but these don't apply for prompt memes.)

Finishing your new prompt meme:

You must click the "Submit" button. If you don't, all your changes will be lost.
Not to worry: you can edit your prompt meme's settings later.

Once you click 'Submit', you will be taken to a second setup page where you can open signups and tweak the settings for your challenge.

Opening and customising your prompt meme challenge

Opening the challenge and setting the schedule

By default, your challenge is set as closed. When you're happy with your settings, tick the box to open signups. If you want to run the challenge for a limited period, you can close the signups again whenever you're ready.

You can enter key times and dates for your challenge - opening and closing times for signups, author reveals if applicable, and the deadline for responses.

Please note: Currently the dates are provided only for information. You will need to manually open and close signup.

Prompt settings

If you want to run an anonymous prompt meme, you can set prompts to be anonymous by default (participants can choose to deanon if they want to).

You can set a minimum of prompts per sign-up, and a maximum number of allowed prompts.

Request settings

In this section, you can set requirements for what prompts must include. By default, all prompts are set to allow one fandom, one character and one relationship, and allow a detailed description, but you can change these settings however you want!

If you'd like to allow or require people to include a url in their prompt (for example, you want to run an art prompts challenge where people link to the prompt images, select that option here.

Tag options

If you want to, you can define what tags people can choose from when making their prompts. These options are mostly useful for gift exchanges (where you want to be sure people are using a defined range of tags for matching purposes) - if you'd like more information on tag options check out the tutorial on setting up a gift exchange.

Signup Instructions

You can enter custom signup instructions to help people participating in your challenge. If you have edited the settings on this page - e.g. to require participants to give at least two characters - make sure you mention it here. You can also give separate instructions for prompt formats, if required.

The boxes 'Label to use for Prompt URL in requests' and 'Label to use for Description in requests' allow you to change those to say what you want people to use those fields for - e.g. linking to an image for an art prompt.

Finishing your prompt meme setup

Whe you're happy with your settings, hit 'Submit' and they will be saved. You can go back and edit at any time.

Congratulations! You have just started a new prompt meme. Enjoy!

NB: A note about anonymous challenges:

In order to track works in a collection, authors can always be seen by the collection's moderator and by the AO3 coders and may be accidentally revealed by a moderator error or software bug. The Archive currently cannot support a totally anonymous prompt meme.

Comment

Post Header

Published:
2011-02-12 22:19:59 UTC
Tags:

So you want to apply some formatting to your fics! You probably already know how to use some basic HTML tags to make stuff <strong>bold</strong> or <em>italic</em>. But perhaps you want something a bit more complex - a different font, or maybe a different color. You can do this by creating some custom CSS for your works!

Cascading Style Sheets are a way to style elements of your story (or any webpage) without having to mess with the HTML markup itself. Where you used to scatter <font> tags all over your code to make some text look like this and some like that, you would now simply assign names (classes or IDs) to parts of your webpage and do all the styling in a separate document (the stylesheet). The upside of this is that if you decide to change the look of your page, you don't have to comb through the HTML code and change all the tags, you can just play around with the CSS rules until you find a style you like.

As is so often the case, things are a lot more complicated once you really dive in, especially if you use CSS to position elements on a page, but this shall not concern us here. You will most likely use CSS to apply a little formatting to your fic that goes beyond the allowed HTML tags, which is what this tutorial will be about.

The Basics

You may have already used Archive skins to change the way the Archive as a whole looks to you when you are logged in. Formatting a work uses the same basic principles: to apply styles to your fics, you create a "work skin" and define what classes you want to use in your stories and what they should look like. And while the general archive skins only affect the user that created them, the styling that you define for your fics will be visible to all readers (unless they disable custom styles; more on that later).

There are three HTML tags you might need in your works:

<div> - creates a container for all sorts of content
<p> - wraps around a paragraph and creates a blank line before and after it
<span> - is used for styling some words or phrases within a paragraph

To apply formatting to your story, you assign a class name to the HTML element in question and create rules for that class in your CSS skin. That sounds way more complicated than it is, so have an example:

Under Dashboard > My Skins > See Work Skins Instead you'll see a work skin like this, with CSS rules defined.

Screenshot of a work skin, showing example CSS

The #workskin at the beginning of each line is an id, and is added automatically. It makes sure that the CSS can be applied to your whole work, and isn't applied to the rest of the page.

The words which begin with a period, like .align-justify are classes. These allow you to create a specific rule and apply it to a specific bit of your work. When you define these in your work skin they must have the period at the beginning.

When you edit a work, you'll use markup like this to apply the CSS rules in your work skin.

Screenshot of the edit work page, showing the HTML markup needed to apply the CSS

(Note: There is no need to apply <p> tags to your whole work, just add tags and classes where you need them and leave the rest alone; the parser should take care of everything else. The Tutorial on HTML Sanitizing and Parsing has more information on marking up your works; however, we are aware of some issues with how the parser behaves right now and are working on fixing those. If you run into wonky-looking text in your own stories, do a quick check if the paragraph in question starts with a <p> tag and ends with </p>. If not, adding those yourself will usually take care of the problem.)

Caveats

If you style a story so heavily that it becomes unreadable or if the reader simply doesn't agree with your font choice, there's a "Hide Creator's Style" button on top of each work that will strip out all bells and whistles except for the basic HTML formatting. CSS formatting will not appear in downloads (.pdf, .epub or .mobi files) either. Keep this in mind when you apply CSS to structure your story and make sure it doesn't fall apart when all CSS is stripped out.

CSS formatting is a great way to enhance certain elements of a story, such as letters in an epistolary fic or character voices in a story that's told from two points of view, but it shouldn't overshadow the actual contents of the fic. Sometimes you really just want a <strong> tag. Conversely, while there is an option to "Hide custom styles on works" under Preferences, which will hide all CSS by default, you might lose out on some really neat stuff if you never see it in action.

Examples

You can find an example stylesheet under Public Work Skins that comes with the most common formatting options already in place. Chances are, if you just want to change some text alignment or font colors, you won't even need to build your own stylesheet. Of course, you can also add more classes or create separate skins as you go. The world is your oyster! Just don't forget to pick the skin from the "Custom Stylesheet?" dropdown when you post.

Let's have a look at some CSS classes.

-

#workskin .align-justify {
text-align: justify;
}

This will make your fic appear as justified text, i.e. neatly aligned on both sides, if you do this:

<div class="align-justify"> Your story goes here. </div>

-

#workskin .font-serif {
font-family: Cambria, Constantia, Palatino, Georgia, serif;
}

This will make a paragraph appear in Cambria if your reader has that font installed on their computer. If not, it will try for Constantia and so on, until it has to fall back on that reader's default serif font, which will be Times New Roman in a lot of cases. To do this, use the following in your fic:

<p class="font-serif">Your paragraph goes here.</p>

-

#workskin .font-orange {
color: orange;
}

This will turn a word in your story orange for the following code:

This is an <span class="font-orange">example</span> sentence.

-

Achtung! Keep in mind that the parser will interpret all carriage returns as linebreaks, so don't use new lines to make the code easier to read for you. They will get turned into <br /> tags.

Where you can use CSS

You can use CSS to style the main body of your work, and in notes fields. You can't use it in summaries, because these show up in indexes, where user-input CSS is not supported. So, if you want to use styled text to include warnings or spoilers, you'll need to put these in the notes field.

Practical Uses

To see how this all works in practice, check out our example story Sliding Doors.

The default display for the work will show you the CSS in action, giving a two column display. If you click 'Hide creator's style' then the CSS styling will be suppressed and you'll see the basic text. As an added bonus, you'll also see the HTML tags which were used to style each bit of the text. The CSS style rules are at the bottom of the page, so you can see how these match up to the HTML and how they were applied to the work. (Note: HTML tags won't normally be revealed when the creator's style is hidden - this was achieved with a bit of extra CSS magic for the purposes of the tutorial.)

Other Frequently Asked Questions About Styling Works


Can I use inline CSS?

No, sorry. We've chosen to limit CSS to work skins in order to preserve the separation of style and content. By creating reusable classes for your fics you can control all your formatting in one stylesheet, and we can easily strip your CSS from a story (important for accessibility reasons) without interfering with the site caching (important for performance reasons). Everybody wins!

Do I need a separate skin for every work I post?

No. The formatting rules you define in one stylesheet can be used and re-used in any of your fics. However, if you have a series of stories that rely heavily on CSS for consistent formatting, it might make sense to create a separate skin just for that set of stories.

What if I never want to see styling on other users' works?

Check the "Hide custom styles on works" box in your Preferences. Alternatively, you can disable styles on a case by case basis by clicking the "Hide Creator's Style" button above the story header.

Will the custom CSS also be applied to file downloads?

No. The files you download (pdf/html/epub/mobi) will have no CSS formatting.

Tutorials and References

For more help on using CSS for styling, you may find the below sites useful. CSS is used to style all modern websites, so there are lots of resources out there (and it's well worth learning a bit about it).


Comment

Post Header

Published:
2010-11-12 04:11:40 UTC
Tags:

Along with the upgrade to Rails 3, there have been significant changes and improvements to our HTML sanitizing and parsing in Release 0.8.2. These changes should make things clearer for authors and much faster for readers!

Here is a quick breakdown for those who just want the highlights, followed by a more detailed explanation of what was changed and how it all works.

Highlights

  • Blank lines and carriage returns will now be converted to paragraph (<p></p>) and line-break (<br />) tags in the text editor.

  • The text will automatically be parsed and "cleaned up" -- any tags that were left open get closed, any mis-nested tags get fixed, etc.

  • The text will be sanitized, to remove any elements that are potentially harmful to our server.

  • This change fixes the known bug where switching from HTML mode to Rich Text mode causes all your paragraphs to disappear. (Yay!)

  • This change will also allow users to embed video from: youtube, vimeo, blip.tv, dailymotion, viddler, metacafe, and 4shared. (Yay!)

What's Behind the Scenes

The new back end for content works in three steps.

  1. There is now a paragraph-adder that converts blank lines and carriage returns into paragraph tags (<p></p>) and break tags (<br />) based on a few simple rules:
  • A blank line left between two pieces of text will be made separate paragraphs:
  • Here is paragraph one.

    Here is paragraph two.

    will become:

    <p>Here is paragraph one.</p>

    <p>Here is paragraph two.</p>

  • A carriage return or newline in the middle of text will add a break tag:
  • Here is a line
    with a carriage return in the middle.

    will become:

    Here is a line <br />
    with a carriage return in the middle.

  • We also will preserve extra blank lines -- if you have TWO blank lines in a row, we will add in an empty paragraph:
  • Here is paragraph one, and I want extra space after it.

    Here is paragraph two.

    will become:

    <p>Here is paragraph one, and I want extra space after it.</p>

    <p> </p>

    <p>Here is paragraph two.</p>

  • Note: The paragraph-adder will put <br /> tags at the end of each line whenever there is a carriage return, even in things like lists. So, if you have a nice chunk of HTML in your story that you coded up by hand like this:
  • <ul>
    <li>Item one.</li>
    <li>Item two.</li>
    </ul>

    You can avoid having <br /> tags added by putting the list into a single line with no carriage returns instead:

    <ul><li>Item one.</li><li>Item two.</li></ul>

  • The next step is a Ruby on Rails gem (basically a kind of plugin) called Nokogiri, which parses the text and gives it back to us as a well-formed chunk of XHTML. What this means among other things is that:

    • any tags that were left open get closed

    • any mis-nested tags get fixed (eg, if you do <strong><em>foo!</strong></em> Nokogiri will turn that into the correct version (<strong><em>Foo!</em></strong>)

    • any attribute values that aren't properly in quotes get fixed


  • Finally, we use the gem Sanitize to clean up this XHTML and take out anything that is legal but not necessarily safe. Sanitize uses a whitelist, meaning that only the tags and attributes we specifically tell it are allowed are let through. It's very customizable, and we have been able to write special rules for Sanitize to safely allow embeds of videos from specific sites (currently: youtube, vimeo, blip.tv, dailymotion, viddler, metacafe and 4shared.) Once Sanitize is done, the final version is saved into the database.

  • There is lots of documentation available on Nokogiri and Sanitize on their respective sites.

    What you see when editing

    • If you are working in a field (like content in the Post New Work form) that allows you to use the Rich Text Editor, the tags <p> and <br /> will show, because otherwise if you switch to the Rich Text Editor, it will do that horrible thing where your whitespace disappears and your text all runs together into one giant blob!
    • If you manually put in some <p> tags that had extra attributes on them, like "<p align=center>", the tags will show.
    • The <p> and <br /> tags will not show when you edit fields like notes and summary, however, where there is no option to use the Rich Text Editor.

    Here's an example of how the tags will look on content in the Post New Work form:

    Comment


    Pages Navigation